
What Is Data And Information ?
Data
-
Definition: Raw facts and figures without context.
-
Example:
50, "rahul", true, 82.5, 2007 -
Explanation: These are just individual pieces of data. On their own, they don’t give much meaning.
Information
-
Definition: Processed or organized data that has meaning and is useful.
-
Example:
"Rahul is 17 years old, scored 82.5% in his exam, and was born in 2007." -
Explanation: Now the data is connected and makes sense—it becomes useful information.
In simple terms:
-
Data = Raw material (like ingredients)
-
Information = Finished product (like a meal)
What is a Database?
A database is an organized collection of data that can be easily accessed, managed, and updated.
Simple Definition:
A database stores data in a structured way, so it can be used efficiently.
Real-Life Examples:
| Example | What the Database Stores |
|---|---|
| School Database | Student names, classes, marks, attendance |
| Hospital Database | Patient details, treatment history, medicines |
| Online Store | Product info, customer orders, payment details |
Key Features:
-
Structured: Data is stored in tables (rows and columns).
-
Efficient: Makes it easy to search, add, update, or delete data.
-
Secure: Keeps data safe from unauthorized access.
-
Multi-user: Many users can access and use the database at the same time.
Example Table in a Database (Students):
| Roll No | Name | Class | Marks |
|---|---|---|---|
| 101 | Rahul | 10 | 85 |
| 102 | Neha | 10 | 78 |
| 103 | Rohan | 10 | 92 |
This is a sample table that could exist in a school’s student database.
In Simple Words:
A database is like a digital cupboard that stores important information in an organized way, so we can find and use it easily.
Would you like me to explain how databases are created using software like Microsoft Access or MySQL?
Full form of SQL Structured Query Language
What is a Database Management System (DBMS)?
Definition:
A Database Management System (DBMS) is software that is used to create, manage, and use databases efficiently.
It acts as a bridge between the user and the database.
Simple Explanation:
A DBMS helps users to store, organize, retrieve,(पुनः प्राप्त करना) and modify data in a structured and secure way, without needing to know complex programming.
Examples of Popular DBMS Software:
-
MySQL
-
Oracle
-
Microsoft SQL Server
-
Microsoft Access
-
PostgreSQL
Main Functions of a DBMS:
-
Data Storage: Stores data in a structured format (tables).
-
Data Retrieval: Allows users to search and fetch specific data.
-
Data Modification: Enables updating or deleting existing data.
-
Security: Protects data from unauthorized access.
-
Backup and Recovery: Helps recover data in case of loss or failure.
-
Concurrency Control: Allows multiple users to work on the database at the same time.
Difference Between Database and DBMS:
| Feature | Database | DBMS |
|---|---|---|
| Meaning | A collection of organized data | Software used to manage the database |
| Purpose | Stores data | Helps in managing and using that data |
| Example | School student records | Microsoft Access, MySQL, Oracle |
In Simple Words:
A DBMS is like a manager who takes care of all the work related to storing and using data in a database.

Advantages of Database Management System (DBMS) – In Short
-
Data Organization: Stores data in a structured and organized way.
-
Easy Access: Quick and efficient data retrieval using queries.
-
Data Security: Controls access and protects data from unauthorized users.
-
Data Consistency: Reduces duplication and maintains accurate data.
-
Backup & Recovery: Automatically backs up data and restores it when needed.
-
Multi-User Access: Multiple users can work on the database at the same time.
-
Data Sharing: Allows data to be shared across different applications or departments.
-
Reduced Redundancy: Avoids storing the same data multiple times.
-
Improved Decision Making: Accurate and timely data helps in better decisions.
-
Scalability: Easily handles increasing amounts of data.
Relational Database Management System (RDBMS)
Definition:
A Relational Database Management System (RDBMS) is a type of DBMS that stores data in the form of tables (also called relations). Each table contains rows (records) and columns (fields).
Key Features of RDBMS:
-
Data in Tables: Data is stored in tabular format (rows and columns).
-
Relationships: Tables can be linked using keys (Primary Key and Foreign Key).
-
Structured Query Language (SQL): Used to create, read, update, and delete data.
-
Data Integrity: Ensures accuracy and consistency of data.
-
Normalization: Removes redundancy and improves efficiency.
Benefits of RDBMS:
-
Easy to understand and use
-
Flexible data handling
-
Supports large amounts of data
-
Ensures data accuracy and security
-
Allows multi-user access
In Simple Words:
An RDBMS stores data in tables and allows those tables to relate to each other, making data easy to manage, search, and connect.

MS Access 2016 – Overview
Microsoft Access 2016 is a database management tool used to create, manage, and operate relational databases. It allows users to handle large amounts of structured data using tools like tables, queries, forms, and reports.
Starting with MS Access 2016
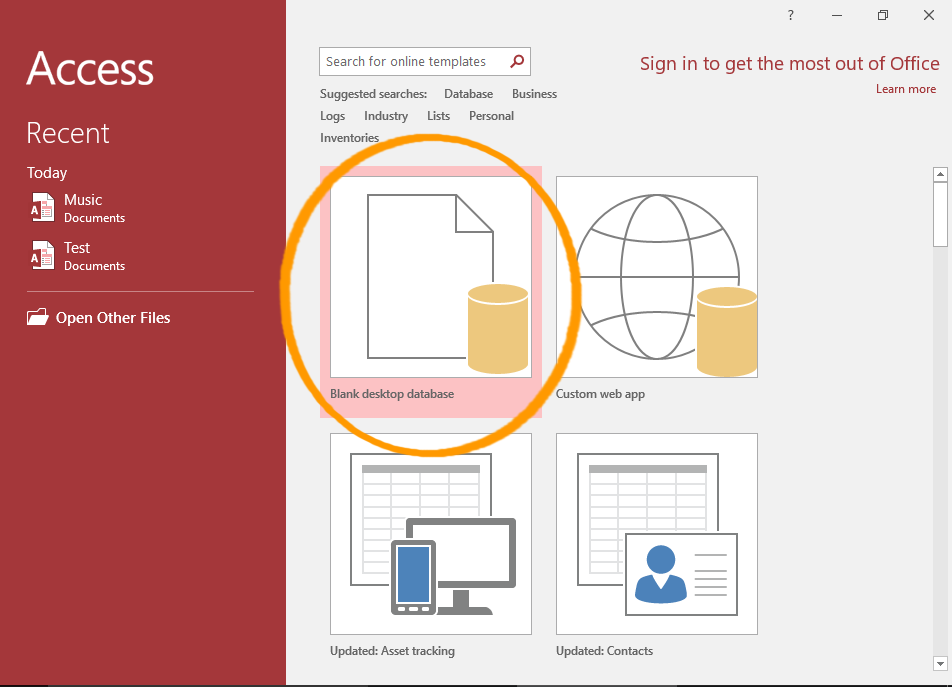
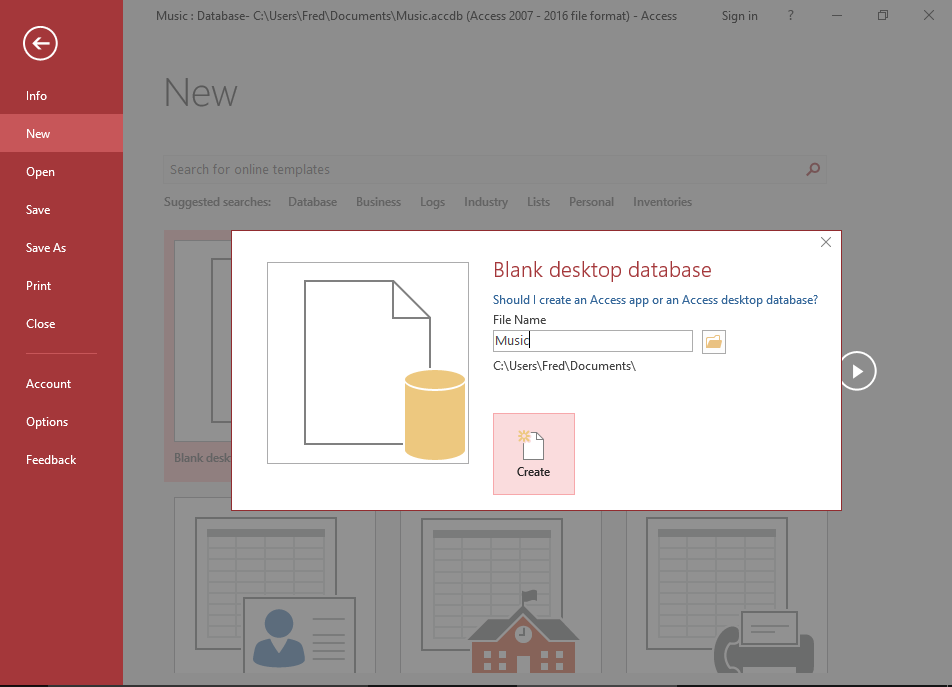
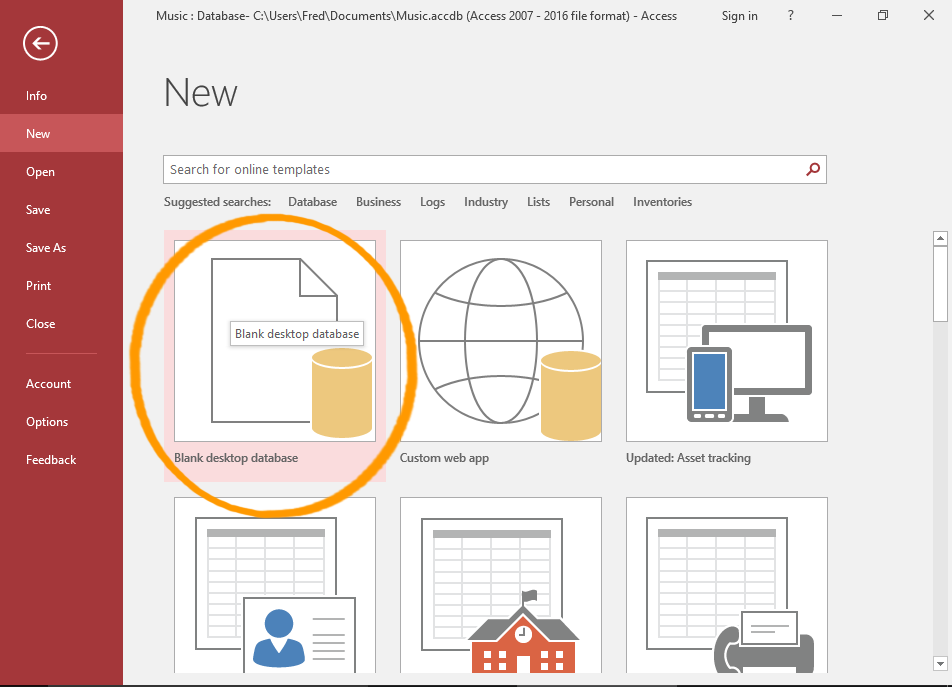
To start MS Access 2016, open it from the Start menu or desktop. Choose a template—usually, a "Blank Database" is selected. Enter a name for your database and choose where to save it. Then click "Create" to begin.
From the Welcome Screen
The Welcome screen is the screen that is displayed when you first open Access.
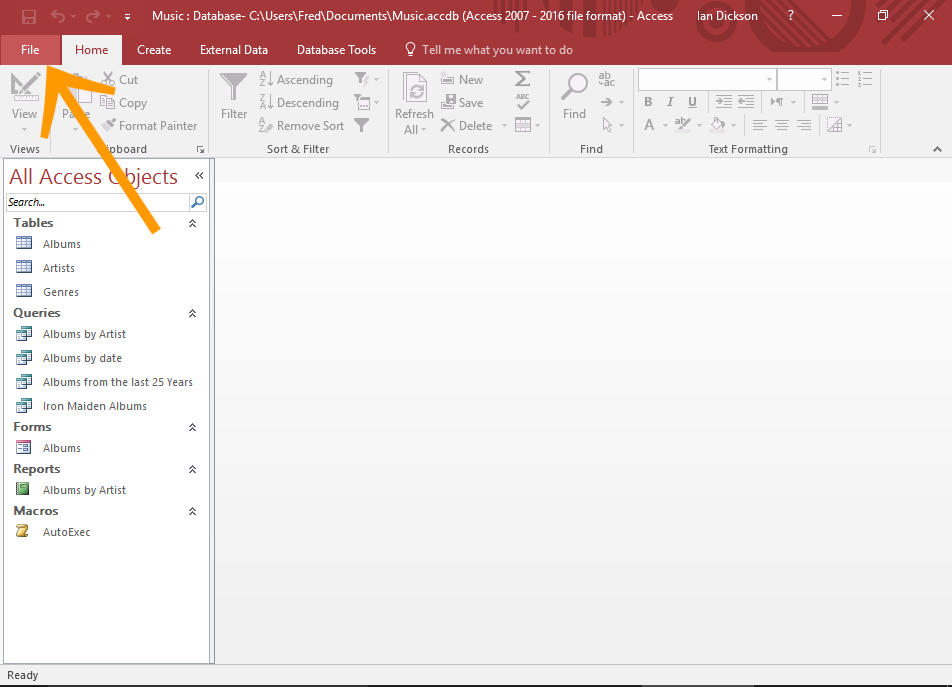
From the File Menu
If you already have Access open, you can create a blank database from the File menu.
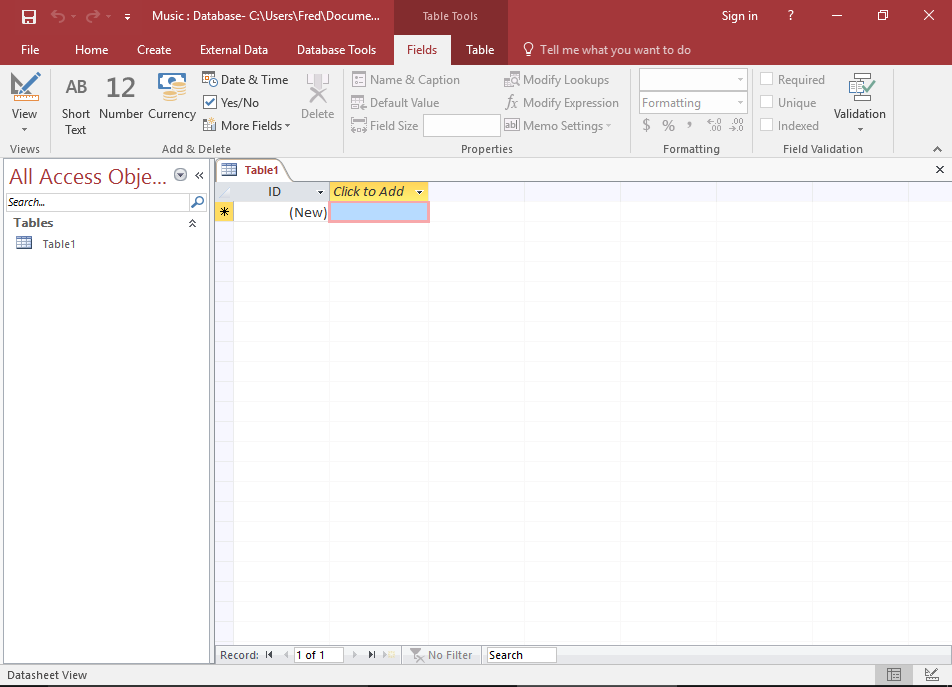
Components of the Database Window
When you open Access, you'll see the Navigation Pane on the left, which lists all your database objects like tables and queries. At the top, there's the Ribbon with commands to create and manage database components. The main part of the screen is the Work Area, where open objects like tables or forms appear. The Status Bar at the bottom gives details about your current view or mode.
Database Objects in MS Access
MS Access includes four main types of objects:
-
Tables: These store the actual data in rows and columns.
-
Queries: These are used to ask questions about your data and display only the information you need.
-
Forms: These are user-friendly interfaces for entering or editing data.
-
Reports: These are formatted outputs designed for printing or viewing data in an organized way.
Difference Between Tables, Queries, Forms, and Reports
Tables are where data is stored. Queries help retrieve specific data from those tables. Forms are used to input or view data more easily, especially for users who are not familiar with databases. Reports are used to generate output, usually for printing or presenting the data in a readable format. Tables and forms allow editing; reports do not. Queries may or may not be editable, depending on their complexity.
Field Data Types in MS Access 2016
When designing a table, each column (or field) needs a data type. Common data types include:
-
Short Text for small strings like names or addresses.
-
Long Text for longer entries like descriptions.
-
Number for numeric values used in calculations.
-
Date/Time for storing dates and times.
-
Currency for financial values.
-
Yes/No for true/false or checkbox fields.
-
AutoNumber which automatically generates a unique ID.
-
Hyperlink for storing links to websites or documents.
-
Attachment for storing files like images or PDFs.
Field Properties in MS Access 2016
-
Field Size
This property is used to set the maximum size of data that can be entered in a field.
For example, in a Short Text field, you can limit the number of characters (default is 255).
In a Number field, Field Size determines the type of number (like Integer, Long Integer, etc.). -
Caption
Caption is the label or title that appears in forms and reports instead of the field name.
For example, if the field name isstu_name, you can set the caption as Student Name to make it easier to read. -
Default Value
This sets an initial value in the field automatically when a new record is created.
For example, if you set the default value to India in a "Country" field, every new entry will have "India" filled in automatically. -
Required
When this is set to Yes, Access will not allow the record to be saved if this field is empty.
Use this when a field must have data (e.g., Student Name or Roll Number). -
Validation Rule
This defines a rule or condition that data entered in the field must meet.
For example, in a "Marks" field, you can set a rule like<=100to make sure marks do not go above 100. -
Validation Text
This is the message that appears if the data entered does not follow the validation rule.
For example, if a user enters 120 in the "Marks" field (when the rule is<=100), you can display a message like "Marks cannot be more than 100."
Database Views in MS Access
MS Access provides two primary views for working with tables: Datasheet View and Design View.
-
Datasheet View shows the table in a row and column format, similar to a spreadsheet. It is used to enter, view, and edit data directly. It's user-friendly and good for quick data entry.
-
Design View allows users to define or modify the structure of a table. You can set field names, choose data types, and apply properties like default values, validation rules, and primary keys. It’s best suited for planning and organizing the database structure before data entry.
Renaming Objects in the Navigation Pane
The Navigation Pane in MS Access displays all database objects such as tables, queries, forms, and reports. To keep your database organized, you can rename any object:
-
Right-click on the object in the Navigation Pane.
-
Select Rename from the context menu.
-
Type the new name and press Enter.
Use meaningful and consistent naming to avoid confusion, like renaming "Table1" to "StudentRecords".
Creating Table in Database
You can create a new table in Access quickly using the Datasheet View:
-
Go to the Create tab and click on Table.
-
A new table opens in Datasheet View.
-
Enter your data directly, and Access automatically assigns field names like Field1, Field2, etc.
-
You can rename these fields and save the table with a suitable name.
This method is quick and ideal for beginners or for quick data entry.
Creating Table in Design View
Design View provides full control over the structure of the table. To create a table in Design View:
-
Click on Create > Table Design.
-
Enter Field Name and choose the appropriate Data Type for each field.
-
Optionally, set field properties such as Field Size, Default Value, and Validation Rule.
-
Save the table with a meaningful name.
Design View is ideal for defining complex structures and ensuring data consistency.
Working with the Table in the Design View
Design View offers tools to customize each field:
-
You can define Primary Key to ensure each record is unique.
-
Change the order of fields, insert or delete fields.
-
Set field properties like format, caption, default value, and required status.
This view is essential when creating a well-structured and reliable database.
Define a Primary Key
A Primary Key is a field (or combination of fields) that uniquely identifies each record in a table:
-
Open the table in Design View.
-
Select the field (e.g., StudentID).
-
Click on the Primary Key icon in the toolbar.
Primary keys prevent duplicate values and are critical for linking tables in relationships.
Setting the Field Properties
Each field in a table has additional properties that help control the behavior of data:
-
Field Size limits the length of text or number storage.
-
Format controls how data is displayed (e.g., currency, date).
-
Default Value automatically inserts a value when a new record is added.
-
Required ensures a field must be filled before saving a record.
-
Caption provides a readable label for forms and reports.
Setting Data Validation Rules Properties
Validation Rules help enforce data accuracy by limiting what users can enter:
-
Set in Design View under "Validation Rule".
-
For example, entering
<=100in a Marks field ensures values don’t exceed 100.
You can also provide a "Validation Text" message like “Marks must not exceed 100” to guide users.
Some Command Validation Rules
Here are common validation rules you might use:
-
>=10 And <=18 for age fields.
-
"Male" Or "Female" for gender fields.
-
Is Not Null to prevent empty entries.
-
Like "[A-Z]*" for text starting with capital letters.
These rules help ensure your database only contains valid, expected data.
Adding New Record to a Table
To add a new record:
-
Open the table in Datasheet View.
-
Scroll to the last row marked with an asterisk (*).
-
Enter the new data into each field.
-
Move to the next row or press Enter to save the record automatically.
Editing Record
To edit an existing record:
-
Locate the record in Datasheet View.
-
Click the field you want to edit.
-
Make the changes and press Enter.
Access saves changes automatically when you move to another row.
Deleting Record
To delete a record:
-
Click the row selector (grey box on the left).
-
Right-click and select Delete Record.
-
Confirm the deletion when prompted.
Deleted records cannot be recovered unless backed up.
Modifying Table Design
To change the structure of an existing table:
-
Open the table in Design View.
-
Edit field names, change data types, or update field properties.
-
Save the table after making changes.
Moving a Field
In Design View:
-
Click the field row you want to move.
-
Drag and drop it to the new position.
-
This helps rearrange the layout for easier use or better organization.
Inserting a Field
To add a new field in Design View:
-
Right-click a field row and choose Insert Rows.
-
Enter the new field name and data type.
This adds a new column without affecting existing data.
Renaming a Field
In Design View:
-
Click on the field name.
-
Type the new name and press Enter.
Use names that clearly reflect the field’s purpose, like changing “FName” to “FirstName”.
Deleting a Field
To remove a field:
-
Right-click the field row in Design View.
-
Choose Delete Rows.
Be careful: all data in that field will be lost.
Changing the Width of the Column
In Datasheet View:
-
Hover between column headers until a double arrow appears.
-
Click and drag to adjust width.
-
You can also double-click to auto-fit the column.
Changing the Data Type of Field
In Design View:
-
Click the Data Type column next to the field.
-
Choose a new type from the dropdown (e.g., Text to Number).
Make sure the new type is compatible with existing data to avoid errors.
Sorting Data in Table
To sort data:
-
Open the table in Datasheet View.
-
Click the drop-down arrow in the column header.
-
Select Sort A to Z or Z to A for ascending or descending order.
Performing Mathematics Calculation
You can use calculated fields in queries or tables:
-
For example:
TotalPrice: [Quantity] * [Rate] -
Calculations can include addition, subtraction, multiplication, or division.
These fields help in analyzing and summarizing numeric data efficiently.
